Appearance Preferences
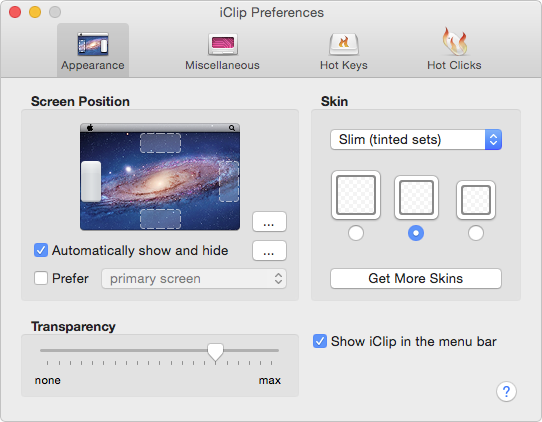
Position on Screen
These radio buttons enable you to choose which side of your screen iClip is positioned on when it’s shown.
You can also choose whether or not you always want iClip to show on your main display if you use multiple monitors on your computer.
For more fine tuning of where the iClip window appears, click the upper  button:
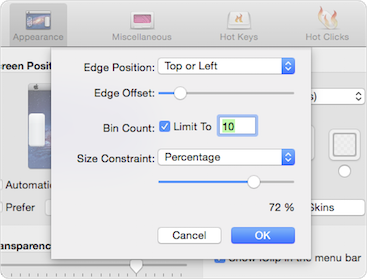
Positioning options
Automatically Show and Hide
If checked, iClip automatically appears when you move your cursor to the screen edge that iClip is positioned on, and hides again when you move your cursor away from iClip.
If unchecked, iClip can only be shown and hidden by the following methods:
- Click the
 icon in the menu bar at the top of the screen.
 - Assign a Hot Key for Show/hide iClip window and then type the key combination you've assigned.
- Double-click the iClip app icon in Finder or re-open iClip via other launcher programs.
With the  button on the right you can further fine tune this behavior, such as choosing to only show iClip if you also hold down a modifier key or rest the mouse for a certain time:
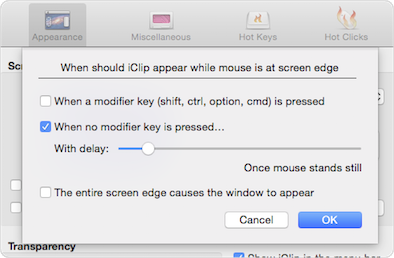
iClip automatic show options
Skin
These controls enable you to choose the clip bin size and their skin appearance in the iClip window.
Click the Get More Skins button to download alternative skins we may have made available in the mean time.
Transparency
This slider is used to change the transparency level of the iClip window. Making the window transparent can be useful for helping you to see what’s behind it.
Show iClip in the menu bar
When checked, the iClip menu bar button appears so that you can quickly show or hide the iClip window by clicking it, as well as right-click on it for quick access to some commands.
Miscellaneous Preferences
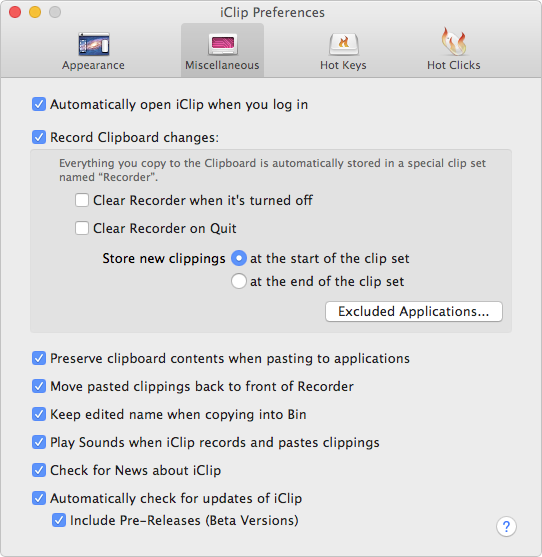
Automatically open iClip when you log in
When checked, iClip will automatically open when you log in and when your computer starts up. (iClip will thereby be added as a Login Item in the Users & Groups system preferences panel.)
Record Clipboard changes
When checked, iClip automatically records everything copied to the Clipboard to the special Clipboard Recorder clip set. You can also choose whether new clippings automatically stored in the Clipboard Recorder are added either at the start or the end of the clip set.
If Clear Recorder when it’s turned off is checked, all clippings in the Recorder will be erased when you uncheck the Record Clipboard changes option or when you turn the recorder off via its Hot Key.
To erase all Recorder clippings when iClip quits (which happens when the computer shuts down or when you log out), check the Clear Recorder on Quit option.
The button Excluded Applications… shows a list of programs that iClip won't automatically record from. 1Password is in this list because it often places passwords into the clipboard, and some users prefer not to have these appear in iClip in plain sight. If you do not mind this, uncheck 1Password. Adobe Illustrator is in this list because this program doesn't work well with iClip (see the FAQ for details). To remove items from the list, ctrl-click on them to get a menu showing the Remove command.
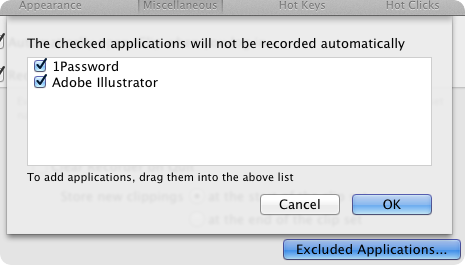
Choosing Excluded Applications
Preserve clipboard contents when pasting to applications
Determines what is left in the clipboard after pasting from a bin in iClip.
When checked, pasting from iClip effectively leaves the clipboard unchanged, keeping what you had copied last, not what you just pasted from iClip.
Example: Copy A, then B. iClip's first bin now contains B, the second contains A. Pasting A from iClip's second bin inserts A into the document. However, B remains in the clipboard, so that using Paste in the current application inserts B into the document.
When unchecked, pasting from iClip leaves that data in the clipboard, so that subsequent Paste commands (cmd+V) insert the same data again.
Move pasted clippings back to front of Recorder
When checked, pasting a clipping from a Recorder bin re-inserts that clipping at the start as if it had just been newly recorded.
Keep edited name when copying into Bin
Suppose you have given a bin a custom name. With this option unchecked, copying a new clipping into the bin will erase the name. When checked, the name will be preserved.
Play Sounds when iClip records and pastes clippings
Plays the whit sound every time a clipping is recorded, copied or pasted by iClip.
You can customize which sounds are played for which particular actions. For details, see Custom Sounds
Check for News about iClip
When checked, iClip may occasionally tell you about news from Irradiated Software about iClip, such as new skins or important messages. Don't worry, this will not be used for promotional messages, and there will be only a few messages in a year, if at all.
Hot Keys Preferences
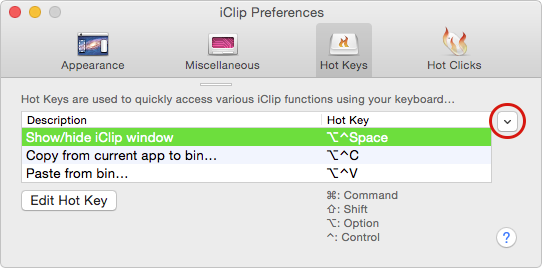
Hot Keys
This list is used to set various Hot Keys so that you can quickly access various iClip operations using your keyboard. To set or change a Hot Key setting, choose the desired one in the list, then click the Edit Hot Key button (you can also double-click it in the list). After the dialog appears, you then press the combination of keys you want to use for the Hot Key. You can also clear a previously set Hot Key in the dialog.
Once you've set a Hot Key, pressing the combination of keys you've chosen for it will perform the operation it relates to.
iClip initially displays only the Hot Keys that all users are encouraged to set. To see additional Hot Keys that can be set, click the red circled button at the right of the list of Hot Keys.
Available Hot Key operations- Show/hide iClip window: Shows or hides the iClip window.
- Copy from current app to bin…: Copies the selected item (e.g. text) and shows the iClip window, letting you type keys to choose the bin into which the item shall be store.
- Copy from current app to next bin: Copies the selected item (e.g. text) into the next free bin of the curring clip set.
- Paste from bin…: Shows the iClip window, letting you choose from which bin you like to paste into the current application.
- Paste plain text from bin…: Same as above, but pasting only the plain text portion of the bin.
- Paste multiple from bin…: Like Paste from bin…, but stays in this mode so that you can paste more clips. Type the Esc key to leave.
- Paste from next bin: Pastes from the bin following the bin that was pasted from the previous time.
- Fill clipboard from bin…: Puts the content of the chosen bin into the Clipboard so that you can paste it with cmd+V later.
- Toggle 'Automatically Show and Hide' setting: Turns automatic showing and hiding of iClip, when the mouse is moved to the screen edge, on or off.
- Switch to previous clip set: Activates the previous clip set.
- Switch to next clip set: Activates the next clip set.
- Switch to Recorder or back: Switches between the recorder and the last used non-recorder clip set.
- Switch to clip set…: Lets you choose the clip set using the up and down keys.
- Add clip bin to end: Adds another empty bin to the current clip set unless there are already 1000 bins.
- Add multiple clip bins…: Adds more empty bin to the current clip set. Same as clicking the "+" button with the option key held down.
- Remove clip bin from end: Removes the last bin from the current clip set.
- Remove multiple clip bins…: Removes bins from the end of the current clip set. Same as clicking the "-" button with the option key held down.
- Create new clip set…: Adds a new clip set and activates it.
- Duplicate current clip set…: Duplicates the current clip set.
- Manage clip sets…: Opens the window for managing all clip sets.
- Clear all clip bins in current clip set…: Empties all clip bins of the current clip set (their clippings will be lost).
- Delete current clip set…: Removes the current clip set along with all clippings it contains.
- Put text from all clip bins into Clipboard: Collects the plain text from all bins of the current clip set and places it into the clipboard.
- Fetch Clipboard text into multiple clip bins: Each line from the clipboard contents is placed into a separate new bin. Does not work with the recorder set active.
- Fetch Clipboard into next available bin: Places the clipboard contents into the next free bin.
- Turn Recording on/off: Same as clicking the Record Clipboard changes checkbox in the Miscellaneous preferences.
- Search Clippings…: Opens the Search window.
- Show Preferences: Opens the Preferences window.
Hot Clicks Preferences
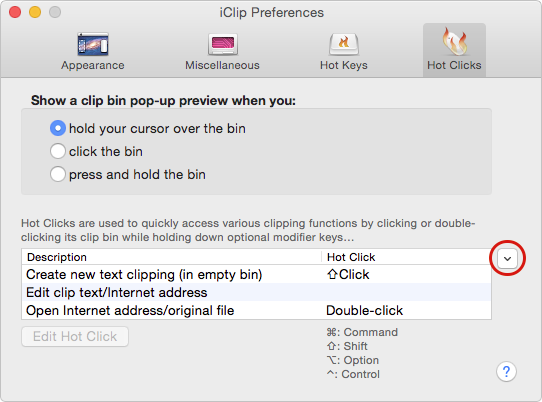
Show a clip bin pop-up preview when you:
These radio buttons enable you to choose how clip bin pop-up previews are shown. You can choose to have them show either when you hold the cursor over the bin, when you click the bin, or when you press and hold the bin.
Hot Clicks
This list is used to set various Hot Clicks so that you can quickly access various clipping operations by clicking or double-clicking its clip bin while holding down optional modifier keys (Command, Shift, Option, Control). To set or change a Hot Key setting, choose the desired one in the list, then click the Edit Hot Click button (you can also double-click it in the list). After the dialog appears, you then click or double-click the bin in the dialog while holding down the desired modifier keys you want to use for the Hot Click. You can also clear a previously set Hot Click in the dialog by clicking the (X) button.
Once you've set a Hot Click, clicking or double-clicking a clip bin while holding down the associated modifier keys you've chosen for it will perform the clipping operation it relates to.
iClip initially displays only the Hot Clicks that all users are encouraged to set. To see additional Hot Clicks that can be set, click the red circled button at the right of the list of Hot Clicks.
Note that you assign right clicks separately from left clicks, and if you have a mouse with more than two buttons, you can assign those as well as hot clicks. And every click can be combined with a modifier key (shift, option, ctrl, cmd). However, double clicking is restricted to the main (left) mouse button.
